Hello, hello dear friends! Welcome to this world of creativity and DIY fun where I, Rebekah (author/DIY enthusiast/stay at home mama) love to share tutorials, tips, and happy thoughts with you on Mondays, Wednesdays, and Fridays (and sometimes days in between)! If you are new here, I am so glad you’ve dropped by! Feel free to make yourself at home and explore a while through the posts and pages here on Charming Imperfections. And, veteran readers, thanks for coming back time and time again!
Some DIY projects you’ll find here are, admittedly difficult and not for the beginner power tool user (if you are a beginner power tool user this “7 Days to Nailing Power Tools” from one of my bloggy friends should help). Today’s project, a pallet backdrop to hang on your wall for décor, is absolutely, positively not one of those! Pretty much anyone who can work a nail gun can make this beauty.
So, join me in this tutorial of how to make an easy pallet backdrop!
Materials and supplies you’ll need (Affiliate links indicated by a *)
- Two disassembled pallets
- Nail Gun
- Paint or Stain of Choice
I think that’s the shortest supplies list I’ve ever written!
I’ve put together a short video for you to see the steps in action. It’s super short because the project is super easy 😉
Here are the written steps:
Like I said, this project is very easy. What isn’t so easy is taking apart two pallets to get all the boards you’ll need. Those pesky pallets can be so tricky to work with! You can do it, though!
Once you have a nice big pile of weathered wood at your disposal you’ll need to locate two of the thicker boards that once lived in the middle of your pallet and supported it. Set them out on the table about 3 feet apart.
*These pictures were just snapshots taken from the video since I didn’t actually take pictures throughout the process…hence the funny faces.*
Now, arrange the pallet boards over those in whatever fashion pleases you. You can make them jagged and uneven, or perfectly square.
Use a nail gun to secure them down. Mine actually stopped working halfway through and I had to finish with screws. I’m just letting you know that that’s an option as well if you don’t have a nail gun ;).
At this point it’s up to you if you want to sand or not. I did to avoid splinters.
To whitewash the whole thing, just water down some white paint, brush it on (lightly), and rub it off as you go. You can also choose to stain it, paint it, or leave it be. Don’t you love choices?
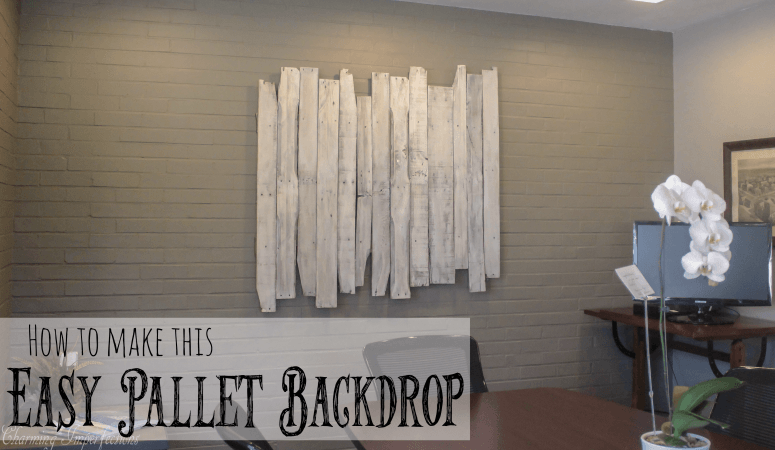
This darling lovely is now hanging in an amazing Industrial Office building I helped to decorate. The owner says he gets all kinds of compliments on it every day! I still can’t believe the impact such a simple project can have on a room, but there it is, in all its glory.
Friends, new and returning, thank you for taking the time to check out this easy project. I hope this inspires and teaches you and helps you toward doing more DIY!
Dina says
Geez, that’s unvlliebabee. Kudos and such.
Thanks Dina!